Part 2 Slaughter
Part 3 Plucking
Part 4 Evisceration and
Chilling
Part 5 Eating & Freezing Part
6 Final Thoughts
After trying to write this post, I concluded that a movie would make a lot more sense. Maybe next year I'll try that, but for now, this is it.
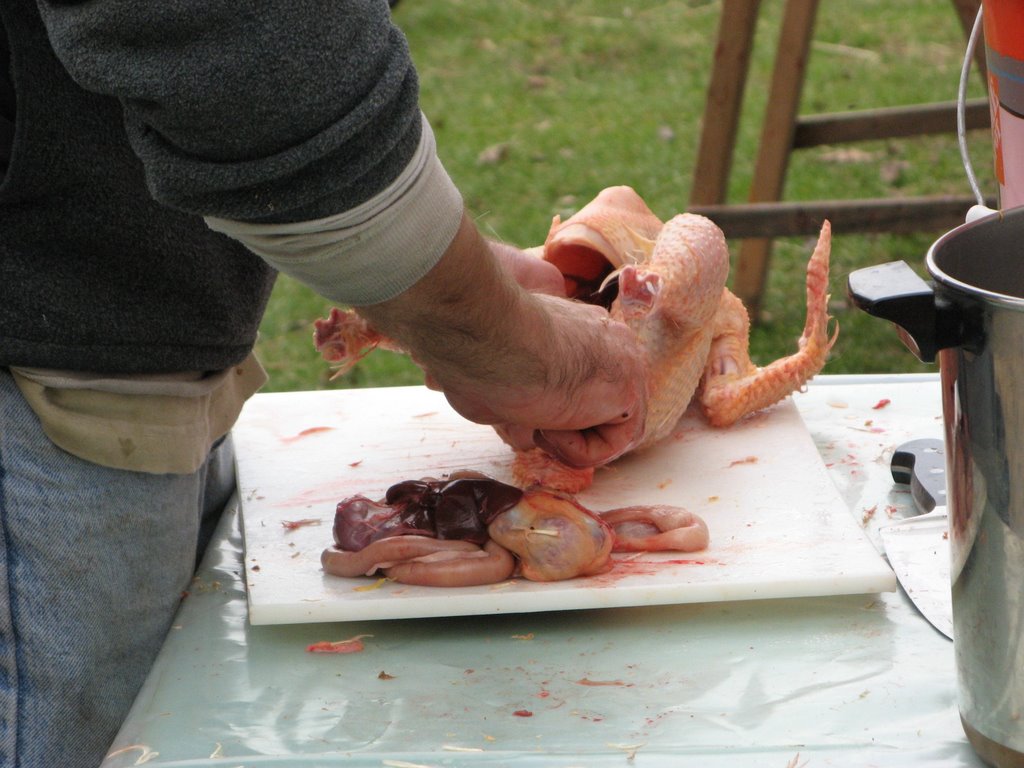
Eviscerating a chicken is the process of removing the insides. It's one of those things that is much easier to show someone rather than write down the process. I'm not sure this post will be of any help in explaining how to evicerate a chicken, but I suppose the pictures show something that people don't often get to observe. Just as there is more than one way to skin a cat there is more than one way to gut a chicken. The follow is what has worked for us.
Step1. After the chicken is finished being plucked, remove the feet. These are removed at the joint. We used a knife to do this, but I think some kind of poultry or garden pruning shears would have been easier.
Step2. Slice off the oil gland. This is on the top (if the chicken is standing up) of the tail.
Step3. Cut off the neck close to the body and save it for soup. At the neck opening you will see two tubes going into the chicken. The smoother one is the esophagus which goes to the crop and the one that looks like a vacuum cleaner hose is the trachea. Loosen them from the body.
Step4. Lay the chicken on its back with the tail facing you. From just under the end of the breast bone, start to cut the skin. Cut down toward the vent about maybe halfway. You want to be careful not to knick the intestine, so you might want to pinch or hold the skin toward you as you are doing this. Now cut the skin from the bottom of the incision to each side. The incision will be an upside down T at this point and should be big enough to squeeze your hand through. If it's not then enlarge it. Do NOT cut all the way down to the vent though.
Step5. Now comes the fun part. You are going to reach inside. The first time I did this I was surprised that it was warm inside a chicken. After years handling chicken for food prep which of course comes from the fridge very cold, I was initially surprised to put my hand inside a chicken and find it warm. It shouldnÂ’t have been a surprise, but it was.
Step6. As you are squeezing your hand through the opening that you just made, run your fingers up along the breast bone. When you are all the way in, grab whatÂ’s inside and pull it out. It takes a little force, but remarkably most all of the insides come out. Do not detach the intestine from the vent just yet.
Step7. Now, cut around the vent. This will be a cut the is shaped like a U. This will separate what you just pulled out and you will have removed the vent without cutting the intestine. You are almost done now and you chicken looks like a “normal” chicken.
Step8. It is possible that when you pulled out everything from the inside the lungs stayed behind. If you do not have a ‘lung puller’ (yes, there is such a thing) then reach in with your index and middle finger and scrape out the two redish pinkish things that are on the bottom and forward.
Step9. If it is a rooster you will notice two things are the size beans on the back of the chicken inside. These are the testicles and can be removed also. IÂ’ve often seen them missed in chicken that I got from the store.
Step10. Now rinse the chicken thoroughly with water inside and out.
Step11. Now you are finished and want to get the chicken cooled down. We fill tubs cold water and ice and chill the chickens down quickly in the ice water for a while before refrigerating them
Store bought chickens usually come with their, liver, heart, and gizzard. For this batch of chickens we saved the hearts and livers and I gave the feet and gizzards away to a friend at work who took them. NOTE. When you are separating the heart and liver from the rest of the insides, you must be careful not to break the gall bladder. It's the greenish thing connected to the liver. If it breaks, bile comes out. We tossed out any liver that bile got onto and then very thoroughly washed any cutting board or knife that bile got onto if we did break the gall bladder.
Shows after the insides have been removed. The large round thing is the gizzard. The dark thing is the liver. Below the liver, is the intestine.

Hey - thanks for the link! (It's my first.) Any interest in writing an article for us when we do a poultry issue? WE pay, um, nothing... but the site looks pretty!
ReplyDeleteThanks also for your suggestion to add a contact email. There are actually a few scattered throughout the site, but I should have one on the home page, and I didn't think of that.
I've enjoyed the butchering information, despite my weak stomach for blood. How is the chicken, is it noticeable better tasting? Are you using the feet in stock?
This was a trip down memory lane... I have to admit as much as I miss having chickens and gathering eggs.. feeling their soft feathers.. I am SO happy to be done with the dressing part. My husband always did the slaughtering and one daughter and I did the rest. She is now 40 and tells anyone who will listen that she could live without eggs and chickens since having to put her hand into those warm chicken bodies.. lol... Great instructions..
ReplyDeleteI just read this post, having been busy with things-not-computer over the holidays. You did a *great* writeup!
ReplyDeleteWe are raising Speckled Sussex, a dual-purpose breed, and their bodies are smaller than your meat birds - but still after having read your description and seeing the pics, I think I could butcher one of ours for roasting.
The few we have butchered, I've flipped them belly-down and cut up either side of their spine with kitchen shears. Then pull the spine off and you can easily see all the innards and get them out.
I was surprised too at how warm the body is, and had to laugh at myself for being surprised. I was also surprised how colorful the innards are, and how nicely they stay in place. I was expecting scrambled gray-ness.
Great writeup!
Great instructions!!!! My husband and I recently decided to raise free range chickens for the eggs but were a little hesitant about our first slaughter. After reading your directions it was surprisingly easy!
ReplyDeleteThanks again
I just did my first culling and had an idea on what to do from growing up with my family having chickens. This filled in all the blanks and from feather to fridge was 30 minutes. Thanks
ReplyDeleteThanks for the tips - makes it sound easyish. Tomorrow is the big day for my two cockerels. It's my first time and I am pretty nervous! I will write up how it goes on my blog thehippychick.net
ReplyDeleteThank you so much for this post! Now I know how to slaughter, pluck, and eviscerate a chicken, all thanks to you.
ReplyDeleteCheers.