 We've had such a warm fall here in Massachusetts. I just noticed this dandelion blooming in my front yard and it actually looks like the grass needs cutting. It's practically December!
Just a few weeks ago I brought this geranium inside to winter over. I probably could have left it outside if I had covered it on frosty nights. There really hasn't been a hard sustained frost yet. My rosemary and sage are still hanging on.
Tuesday, November 28, 2006
Warm Fall
Sunday, November 26, 2006
Chicken Butchering - Part 1 - Prep
As you may remember from earlier posts, I'm involved in a pastured poultry project at Codman Farm. We are raising some White Rock chickens out on pasture. They spend their days outside in the cow pasture and at night they go into the mobile coop to sleep and be safe from owls and other flying predators. Ground predators are stopped by the portable electric fence that surrounds them. Every few days the mobile coop is moved to a new area so they can have fresh pasture.
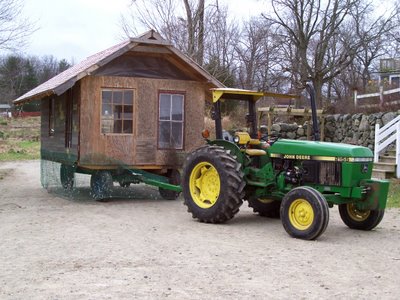
Last Monday was butchering day. The first step started the day before. Instead of giving the chickens their usual afternoon feed and water, they are only given water. Essentially they are on a clear liquid diet for the 12 hours before butchering. This insures that there is little or no food in their digestive tract. That will make an easier and cleaner job the next day. The next morning they are brought to the area where we will kill and butcher them. Because they sleep in the mobile coop, this job is very easy and does not involve chasing or catching or stressing the chickens. Heidi drove the tractor to the field, hooked up the mobile coop, and towed them back. It's a really simple way to "round up" 124 chickens.
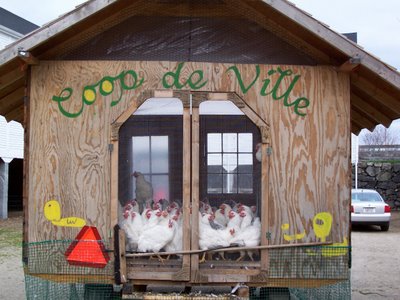
 From the other side of the coop you see can the chickens all at the anxious to get out. It is a simple matter to open the door and take one out at a time to butcher. One feature of the mobile coop that you can not see from the picture is that the floor boards are spaced so that much of the manure falls out. This means that the coop doesn't need constant cleaning. The manure that falls fertilizes the cow pasture.
 NOTE: I'm wondering if this chicken butchering series is going to bother anyone. I plan to indicate in the title what will be covered and have some text before the pictures so people have a chance to leave if they don't want to look at the pictures. What does everyone think? I really don't want to upset upset someone who is unprepared. For those of you who are really interested in the process, another blogger has created a really great video clip of the process which you can see here.
Last Monday was butchering day. The first step started the day before. Instead of giving the chickens their usual afternoon feed and water, they are only given water. Essentially they are on a clear liquid diet for the 12 hours before butchering. This insures that there is little or no food in their digestive tract. That will make an easier and cleaner job the next day. The next morning they are brought to the area where we will kill and butcher them. Because they sleep in the mobile coop, this job is very easy and does not involve chasing or catching or stressing the chickens. Heidi drove the tractor to the field, hooked up the mobile coop, and towed them back. It's a really simple way to "round up" 124 chickens.
 From the other side of the coop you see can the chickens all at the anxious to get out. It is a simple matter to open the door and take one out at a time to butcher. One feature of the mobile coop that you can not see from the picture is that the floor boards are spaced so that much of the manure falls out. This means that the coop doesn't need constant cleaning. The manure that falls fertilizes the cow pasture.
 NOTE: I'm wondering if this chicken butchering series is going to bother anyone. I plan to indicate in the title what will be covered and have some text before the pictures so people have a chance to leave if they don't want to look at the pictures. What does everyone think? I really don't want to upset upset someone who is unprepared. For those of you who are really interested in the process, another blogger has created a really great video clip of the process which you can see here.
Friday, November 24, 2006
Thanksgiving Squash

Thanks to Helen of Beyond Salmon for giving me an idea of what to do with the delicata squash that I grew this summer. I made a variation of her recipe for Thanksgiving dinner.
Sunday, November 12, 2006
I'm Still Here - New Camera on the Way
 Wow It's hard to believe it's been almost a month since I posted. I've finally ordered a new camera to replace my old one that bit the dust. I've borrowed a camera in the mean time, but it's just no fun using it and I don't like posting without a photo. I've decided on a Canon Powershot A710 to replace my Nikon Coolpix 950 that I did love despite the fact that it was a 2 megapixel camera and quite old. I should have the new one in about 1o days.
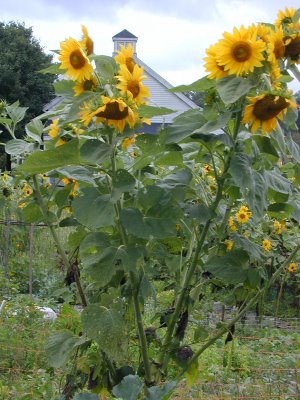
In the mean time, here are some photos of sunflowers. Where I plant my vegetable garden, sunflowers grow wild and I always leave or transplant one or more to act as "poles" for something climbing. Last year I grew Romano pole beans on some sunflowers and this year I grew yardlong beans one sunflower stalk. When the sunflower is a few feet tall I pinch the ends to make it branch to give the beans more places to climb. As the beans grow up the plant I also pull off as many leaves from the sunflower plant as I can without killing it. This is to let more light in. This was my first year growing yard long beans. I didn't like the taste as much as regular string beans, but I did like it enough to grow them again. Each beanpod is about 18 inches long . That makes harvesting go really quickly.
 If you click on the photo for a larger image, you can see some of the yardlong beans hanging on the right side of the plant.
Subscribe to:
Comments (Atom)